

 English
 中文简体
中文简体What Liquid Cooled CPU Maintenance Actually Involves
Liquid cooled CPU maintenance is not a once-a-year task — it is a continuous process of monitoring, cleaning, and replacing components before they fail silently and cause thermal damage. The core conclusion: most liquid cooling failures trace back to neglected coolant, degraded tubing, or a malfunctioning condensing unit rather than the pump or radiator itself. Catching these issues early prevents CPU throttling, unexpected shutdowns, and in worst cases, permanent silicon damage from sustained temperatures above 90°C.
Whether you are running a custom open-loop system, an all-in-one (AIO) closed-loop cooler, or an immersion/refrigerant-based rack setup with a dedicated condensing unit, the maintenance principles differ in scope but share the same logic: keep the fluid clean, keep the heat transfer surfaces free of buildup, and verify that every mechanical component in the loop is performing within spec.
This guide covers each maintenance area in practical depth — with specific intervals, measurable thresholds, and real failure patterns drawn from both consumer builds and data center deployments.
How Liquid CPU Cooling Systems Are Structured
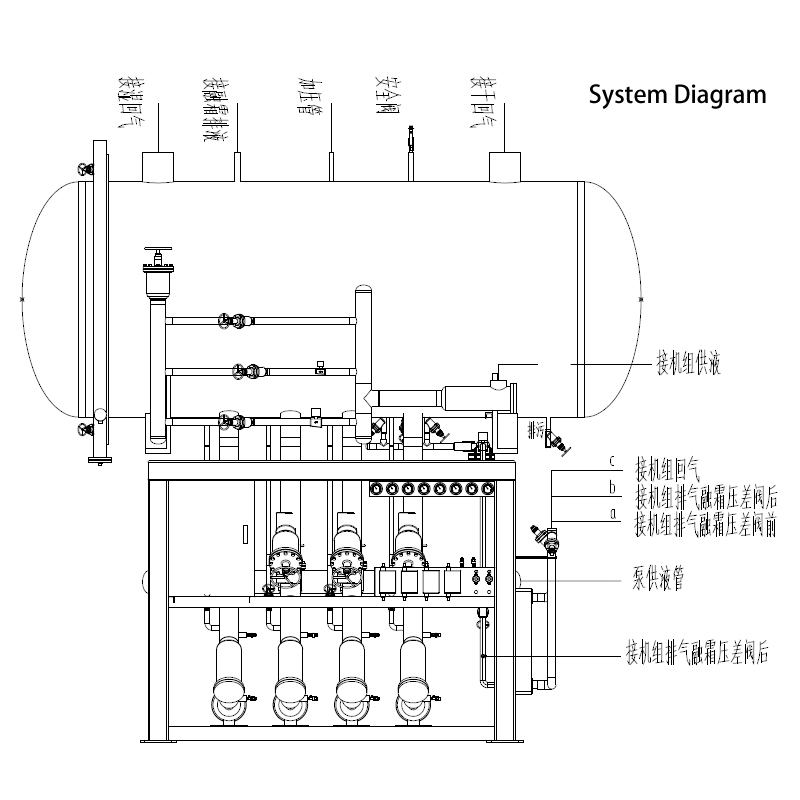
Understanding what you are maintaining starts with knowing what each component does and where it sits in the thermal chain. A typical liquid cooling loop moves coolant from the CPU water block, through tubing, into a radiator where heat is expelled, and back through a reservoir and pump. Enterprise and server-grade setups extend this principle by incorporating a condensing unit — a refrigerant-based heat rejection module — to achieve sub-ambient cooling that standard radiators cannot match.
Key Components and Their Maintenance Relevance
- CPU Water Block: Direct contact with the processor. Copper or nickel-plated fins accumulate mineral deposits and oxidation over time, reducing thermal conductivity.
- Pump: Circulates coolant. Bearing wear and cavitation are common failure modes after 3–5 years of continuous operation.
- Radiator: Dissipates heat to ambient air via fans. Fin blockage from dust is one of the fastest ways to degrade cooling performance — as little as 2mm of dust accumulation can reduce airflow efficiency by 15–20%.
- Reservoir: Holds excess coolant and allows air bubbles to escape. Low fluid levels are often the first visible sign of evaporation or a slow leak.
- Tubing: Flexible or rigid. Soft tubing (EPDM, PVC, PETG) hardens and cracks over time; rigid acrylic or PETG can yellow and become brittle under UV exposure.
- Coolant/Fluid: Premixed distilled water with corrosion inhibitors or purpose-formulated coolants. Biocides degrade and pH can drift acidic, accelerating metal corrosion.
- Condensing Unit (in refrigerant-based systems): Uses a compressor cycle to reject heat at sub-ambient temperatures. Requires refrigerant charge verification, condenser coil cleaning, and compressor health checks — maintenance steps absent from standard loop systems.
For server deployments, the condensing unit is essentially the heart of the cooling infrastructure. A single failed condensing unit can leave multiple CPUs without adequate cooling, making its maintenance schedule non-negotiable in any uptime-sensitive environment.
Coolant Maintenance: Flush Intervals, pH Levels, and What Goes Wrong
Coolant degradation is the number one cause of premature component failure in liquid cooling systems. Many builders flush their loop once a year; the more accurate answer depends on the fluid type, metals in the loop, and operating temperature.
Coolant Flush Frequency by System Type
| System Type | Recommended Flush Interval | Key Risk if Neglected |
|---|---|---|
| Custom open-loop (distilled water + biocide) | Every 6–12 months | Algae growth, copper oxidation, microbial slime |
| Premixed proprietary coolant (e.g., EK CryoFuel, Mayhems) | Every 12–18 months | Inhibitor depletion, pH drop, dye precipitation |
| AIO closed-loop cooler | 3–5 years or replace unit | Coolant loss through micro-permeation, pump failure |
| Server liquid cooling with condensing unit | Every 6 months (fluid circuit) + annual refrigerant check | Refrigerant leaks, oil migration in compressor, coolant contamination |
pH Testing: The Maintenance Step Most Builders Skip
Coolant should maintain a pH between 7.0 and 8.5. Below 7.0, the fluid becomes acidic and begins etching copper and aluminum surfaces, producing dissolved metals that plate out onto the water block fins as scale. Above 8.5 indicates over-alkalization, often from degraded inhibitor packages reacting with certain metals. A simple aquarium pH strip test costs under $5 and takes 30 seconds — there is no good reason to skip it during scheduled maintenance.
Green or brown discoloration in transparent tubing or the reservoir is a visual indicator that pH has drifted and that copper corrosion is actively occurring. At that stage, a full flush is overdue and the water block should be disassembled and inspected for mineral buildup.
How to Flush a Liquid Cooling Loop
- Power down the system completely and disconnect from mains power.
- Drain the loop through the lowest drain port into a clean container. Note the fluid color and smell — both indicate degradation level.
- Run a flush solution (distilled water with 5–10% white vinegar or a commercial flush agent) through the loop by temporarily reconnecting and running the pump for 15–20 minutes.
- Drain completely, then run two pure distilled water flushes to remove any cleaning agent residue.
- Refill with fresh coolant. Re-bleed the loop by tilting the case gently to allow trapped air bubbles to migrate to the reservoir.
- Run the system at idle for 30 minutes and check all fittings for seepage before closing the case.
Condensing Unit Maintenance in Refrigerant-Based Cooling Systems
In high-performance workstations and server environments where processors run sustained workloads — rendering farms, AI inference nodes, HPC clusters — a condensing unit replaces or supplements the radiator as the primary heat rejection mechanism. The condensing unit uses a refrigerant compressor cycle (similar to an air conditioner) to achieve coolant temperatures well below ambient, enabling CPU junction temperatures to remain stable under loads that would overwhelm air-cooled radiators.
Maintaining the condensing unit properly is not optional — it is the most technically demanding aspect of refrigerant-based liquid CPU cooling maintenance.
Condensing Unit Maintenance Checklist
- Condenser coil cleaning (every 3 months in dusty environments, every 6 months otherwise): The condenser coil on the condensing unit must remain clear of dust, lint, and debris. A clogged coil forces the compressor to work harder against elevated head pressure, shortening its service life and reducing cooling capacity by 10–30% depending on blockage severity. Use compressed air at 30–40 PSI directed through the coil fins from the inside out to avoid pushing debris deeper.
- Refrigerant charge verification (annually by a certified technician): Low refrigerant charge in a condensing unit manifests as elevated suction pressure, higher-than-normal CPU temperatures despite the system appearing functional, and compressor short-cycling. Unlike coolant in an open-loop system, refrigerant loss in a condensing unit means there is a leak somewhere in the sealed circuit — simply topping up without finding and repairing the leak is not a valid maintenance action.
- Compressor vibration and noise monitoring (ongoing): A healthy compressor in a condensing unit runs quietly with a consistent hum. Rattling, grinding, or intermittent clicking points to bearing wear or liquid slugging (liquid refrigerant entering the compressor). Log noise baseline early and compare over time.
- Fan inspection on the condensing unit: Condensing unit fans operate continuously under load. Check blade condition, bearing play, and RPM output against the manufacturer's spec every 6 months. A fan running 20% below spec RPM due to bearing drag measurably increases condensing temperature.
- Condensate drain check: If the condensing unit operates at sub-dew-point temperatures, condensation forms on cold surfaces. Blocked condensate drains cause water pooling near electrical components — a serious hazard in rack-mounted deployments.
- Thermal expansion valve (TXV) or electronic expansion valve (EEV) inspection: These valves regulate refrigerant flow through the evaporator. Debris or ice blockages cause erratic superheat and suction pressure fluctuations. This inspection requires a refrigeration gauge manifold and is best performed by a qualified technician.
In enterprise settings, a condensing unit that serves multiple CPU liquid cooling loops is a shared point of failure. Scheduling quarterly preventive maintenance on the condensing unit — as opposed to reactive repairs — has been shown to reduce unplanned downtime by over 60% in data center environments that have tracked this metric over multi-year periods.
Signs the Condensing Unit Is Underperforming
- CPU temperatures trending 5–10°C higher than baseline under identical workloads
- Compressor cycling on and off more frequently than usual (short-cycling)
- Ice formation on the evaporator or suction line of the condensing unit — indicates low refrigerant or airflow restriction
- Higher-than-normal ambient noise from the condensing unit area
- Visible oil staining near refrigerant line connections — often the first visible sign of a refrigerant leak
Water Block Cleaning and Thermal Interface Material Replacement
The CPU water block is where the thermal work actually happens. Even a perfectly maintained loop with clean coolant will deliver subpar performance if the water block's cold plate is fouled with mineral scale or if the thermal interface material (TIM) between the block base and CPU IHS has degraded.
Disassembling and Cleaning the Water Block
Water block cleaning frequency depends on coolant discipline. With monthly top-ups using fresh premixed coolant and annual full flushes, a water block can go 2–3 years before mineral deposits become performance-limiting. With distilled water and a Silver Kill Coil biocide setup, the same interval applies. Neglected systems using untreated tap water will show visible scale in the water block within 6 months.
To clean the water block:
- Remove the block from the CPU mounting. Drain coolant from the block over a container.
- Disassemble the top and cold plate per the manufacturer's instructions. Note screw torque specs — overtightening damages the copper fins.
- Soak the cold plate in a 50/50 white vinegar/distilled water solution for 20–30 minutes to dissolve calcium and mineral scale.
- Use a soft toothbrush to gently scrub the microfinned surface. Avoid abrasive pads — they scratch the nickel plating and create corrosion initiation sites.
- Rinse thoroughly with distilled water and allow to dry completely before reassembly.
- Inspect the O-ring seal. Replace if compressed, cracked, or shows flat spots.
When to Replace Thermal Interface Material
TIM between the water block and CPU IHS (integrated heat spreader) degrades over time through a process called pump-out — thermal expansion cycles physically displace paste outward from the contact zone, creating air pockets. Most high-quality thermal compounds (MX-4, Kryonaut, NT-H1) should be replaced every 2–3 years on a CPU under continuous load. For liquid metal TIMs like Conductonaut or Kryonaut Extreme, the interval extends to 3–5 years, but application is more involved and incompatible with aluminum surfaces.
Signs that TIM has degraded and needs replacement include a sudden 5–8°C rise in CPU temperatures without any change in ambient conditions or workload, or visible dried paste around the water block perimeter when the block is removed for any reason.
Radiator and Fan Maintenance for Open-Loop Systems
The radiator is the interface between the water loop and ambient air. Its performance is directly proportional to how clean its fins are and how much airflow the fans push through them. In a desktop system, a 360mm radiator covered in 3mm of dust from a dirty environment can see its effective thermal resistance increase by 20–25% — which translates directly into higher CPU temps.
Radiator Cleaning Procedure
- Blow out dust from the radiator fins with compressed air every 2–3 months in average home environments. Use short bursts at an angle to avoid bending the thin aluminum fins.
- For heavier buildup, remove the radiator from the case and rinse fins with low-pressure water spray while the loop is drained. Allow to dry completely before reinstalling.
- Inspect fin straightness — bent fins reduce airflow. A fin comb or a thin flat implement can gently straighten minor bends.
- Check for green or white deposits on the radiator surface — these indicate glycol/inhibitor leaching from coolant and signal a pH or concentration problem in the fluid.
Fan Health and Bearing Wear
Radiator fans are often the first mechanical component to show wear signs in a liquid cooling system, primarily because they run continuously and are exposed to more turbulent airflow than case fans in clean zones. Sleeve bearing fans typically last 30,000–50,000 hours; fluid dynamic bearing (FDB) or dual ball bearing fans reach 100,000+ hours under normal operating temperatures.
Maintenance action: Every 6 months, spin each fan manually with power off and feel for grinding, clicking, or uneven resistance. Any of those indicates bearing wear. A fan running 200–300 RPM below its spec under the same PWM signal is another sign. Replacing a $15–25 fan proactively costs far less than the thermal damage that follows if the fan fails mid-workload.
Tubing Inspection, Fitting Checks, and Leak Prevention
Leaks are the event that liquid cooling critics point to most often — and they are almost always preventable with proper maintenance. The majority of leaks in custom loops originate from three sources: degraded flexible tubing, improperly seated fittings that were never re-checked after initial installation, and O-ring failure in components that have been repeatedly removed and reinstalled.
Tubing Inspection Schedule
| Tubing Type | Expected Lifespan | Key Failure Sign | Inspection Interval |
|---|---|---|---|
| PVC (clear soft tubing) | 2–3 years | Yellowing, hardening, fitting looseness | Every 6 months |
| EPDM (black rubber) | 5–7 years | Micro-cracking at bends, surface chalking | Annually |
| Rigid PETG/acrylic | 4–6 years | Stress cracks at bends, clouding near fittings | Every 6 months |
Fitting Torque and Re-checking Protocol
Compression fittings on rigid tubing and barb fittings on soft tubing both require periodic re-checking. Compression fittings rely on a collet that grips the tubing wall — vibration from fans and pumps can cause them to work slightly loose over 12–18 months. Barb fittings are typically clamped with hose clamps; inspect clamp tension and the tubing-to-barb seal at every coolant flush.
Best practice before any system maintenance that requires partial disassembly: run the pump for 30 minutes after reassembly with the system horizontal and the power supply running but the motherboard unpowered (using a PSU jumper cable). If no seepage appears in that window, the connections are secure.
Pump Maintenance and Replacement Triggers
The pump is the only active mechanical component in a standard open-loop system. Most custom loop pumps — DDC-style (DC-DC Converter) or D5-style centrifugal pumps — are rated for 50,000 hours under spec conditions. In practice, this translates to roughly 5–8 years of 24/7 operation before bearing wear begins to affect flow rate.
How to Monitor Pump Health
- Flow rate measurement: Inline flow meters (available for $20–40) provide real-time L/min readings. A D5 pump in good condition moves 300–500 L/hr depending on head pressure. A reading 20% or more below baseline suggests impeller wear or partial obstruction from particulate buildup.
- Acoustic monitoring: A healthy pump runs quietly. Whining, rattling, or gurgling that persists after bleeding indicates bearing issues or cavitation.
- Temperature correlation: If coolant temperatures rise by 3–5°C under the same load conditions month over month without any change in ambient temperature, reduced flow rate from pump degradation is a likely cause.
- Filter/strainer cleaning: Some pump heads include a small filter screen at the inlet. Clean this screen at every flush — particulate buildup here is a common and easily overlooked cause of flow restriction.
Unlike a condensing unit compressor where servicing requires specialized refrigeration tools and certification, a failed liquid cooling pump in a desktop loop is a user-replaceable component. Budget $50–120 for a replacement D5 or DDC pump head — far cheaper than CPU damage from a cooling failure.
Maintenance for AIO Liquid Coolers: Different Rules Apply
All-in-one liquid coolers are sealed units — they cannot be refilled, and their internal coolant volume is fixed from the factory. This simplicity comes with a different maintenance paradigm: instead of maintaining the fluid circuit, the maintenance focus shifts entirely to the external components and the system's operating life.
AIO Maintenance Tasks
- Radiator dust cleaning every 2–3 months. Same principle as open-loop radiators — dust on the fins increases thermal resistance and forces the CPU to run hotter.
- Fan replacement as needed. AIO fans are standard 120mm or 140mm units and easy to replace. Fan failure is often the first component failure in an AIO system.
- TIM replacement every 2–3 years. Even though the loop itself is sealed, the thermal paste between the pump block cold plate and the CPU IHS still degrades. Remove and re-paste on the same schedule as open-loop systems.
- Monitor for pump gurgling or hiss. AIO pumps are not field-serviceable, but auditory changes combined with rising CPU temps signal that the pump head is failing. At that point, the entire AIO unit needs replacement.
- Plan for full unit replacement at 4–6 years in 24/7 operation, or 6–8 years in typical desktop use. The sealed coolant in most AIOs slowly permeates through the hose walls over years — this is not a defect, it is physics. Eventually the coolant volume drops below functional levels.
Building a Liquid Cooled CPU Maintenance Schedule
The most reliable approach to liquid CPU cooling maintenance is a tiered schedule — weekly visual checks, monthly performance verification, and full physical maintenance at defined intervals. Ad-hoc maintenance only after problems appear is the reason most cooling failures happen: the warning signs were present but no one was watching.
Recommended Maintenance Schedule by Task
| Frequency | Task | Applies To |
|---|---|---|
| Weekly | Check CPU temps at idle and load vs. baseline | All systems |
| Monthly | Check reservoir coolant level; inspect tubing for discoloration | Open-loop |
| Every 3 months | Blow dust from radiator fins; test coolant pH | Open-loop, AIO |
| Every 3 months | Clean condensing unit coil; inspect condensate drain | Refrigerant systems |
| Every 6 months | Check fan RPM; inspect tubing and fittings; audit pump noise | All systems |
| Annually | Full coolant flush and refill; water block cleaning; TIM inspection | Open-loop |
| Annually | Refrigerant charge verification; compressor health check (by technician) | Refrigerant/condensing unit systems |
| Every 2–3 years | Replace thermal interface material | All systems |
| Every 2–3 years | Replace soft tubing if PVC; inspect rigid tubing stress points | Open-loop |
Logging maintenance dates and CPU temperature baselines in a simple spreadsheet takes less than five minutes per session and creates the historical data needed to spot performance drift before it becomes a failure event. For systems running a condensing unit, this log should also include compressor run hours and any refrigerant service dates.
Common Mistakes That Accelerate Liquid Cooling Degradation
Beyond simple neglect, several specific practices dramatically shorten the service life of liquid CPU cooling systems. These come up repeatedly when diagnosing failed builds:
- Mixing metals without inhibitors: Running a copper water block with an aluminum radiator creates a galvanic cell. Without proper inhibitors, electrolytic corrosion generates aluminum oxide particles that clog the water block fins. Either avoid mixing metals or use a coolant explicitly formulated for mixed-metal loops.
- Using tap water: Even "soft" tap water contains dissolved minerals that precipitate as scale when heated. The calcium carbonate deposits that form inside water block fins have a thermal conductivity roughly 100x lower than copper — even a thin layer degrades performance measurably.
- Overfilling the reservoir: Coolant expands when heated. A full-to-the-brim reservoir leaves no expansion headroom, increasing internal pressure at operating temperature and stressing pump seals and fittings.
- Running the pump dry during initial fill: Even brief operation without coolant fully priming the pump can score the ceramic shaft bearing. Always ensure coolant is present in the pump before powering on.
- Ignoring the condensing unit in refrigerant-based builds: Treating the condensing unit as a "set and forget" component is one of the most expensive maintenance oversights in server liquid cooling. A gradual refrigerant leak over 18 months can cause the condensing unit to lose 40% of its cooling capacity before CPU temperatures reach alarm thresholds.
- Skipping leak testing after any disassembly: Any time the loop is opened — for a water block cleaning, fitting replacement, or adding a component — a full leak test with paper towels placed under all fittings and a 30-minute powered pump run should be performed before the system is returned to normal operation.


