English
 中文简体
中文简体What Is a Condensing Unit?
A condensing unit is the outdoor section of a split-type air conditioning or refrigeration system. Its core job is to release the heat that has been absorbed from an indoor space or a refrigerated enclosure, then send cooled refrigerant back inside to repeat the cycle. Without this component, no mechanical cooling system can complete its thermodynamic loop.
In practical terms, a condensing unit typically consists of three major parts working together: a compressor, a condenser coil, and one or more fans. These parts are housed in a single weatherproof cabinet that sits outdoors—on the ground beside a building, on a rooftop, or on a wall bracket. The unit receives high-temperature, high-pressure refrigerant vapor from the indoor evaporator coil, cools it until it condenses back into liquid form, and returns it to continue absorbing heat indoors.
This article explains exactly how a condensing unit works, what its main components do, what types are available, how to size one correctly, and what maintenance it requires to perform reliably over time.
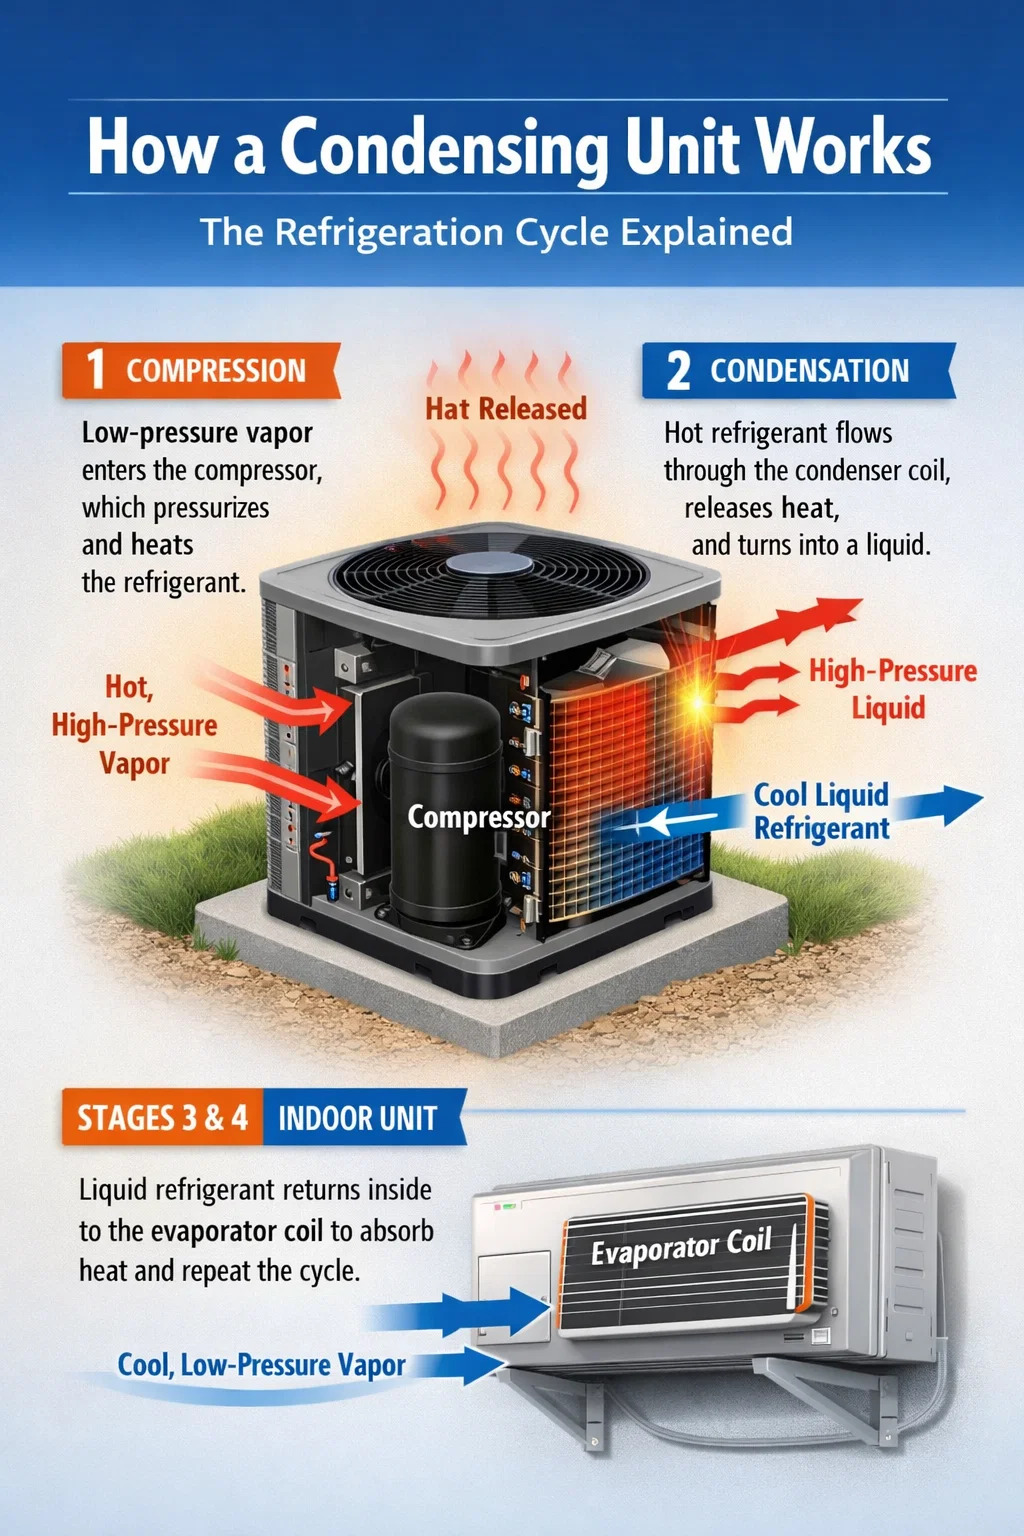
How a Condensing Unit Works: The Refrigeration Cycle Explained
To understand what a condensing unit does, you need to understand the vapor-compression refrigeration cycle. This cycle has four stages, and the condensing unit is responsible for two of them.
Stage 1: Compression
Refrigerant arrives at the condensing unit as a low-pressure vapor after it has absorbed heat from inside the building. The compressor pressurizes this vapor, raising its temperature significantly—often to between 140°F and 180°F (60°C–82°C) depending on the refrigerant type and system design. This high temperature is intentional: it creates the temperature difference needed for heat to flow from the refrigerant into the cooler outdoor air.
Stage 2: Condensation
The hot refrigerant vapor travels through the condenser coil, which is a series of metal tubes with aluminum fins attached. A fan forces outdoor air across these fins, pulling heat away from the refrigerant. As the refrigerant loses heat, it transitions from vapor to liquid—this phase change is called condensation, which is where the condensing unit gets its name. The refrigerant exits the coil as a high-pressure liquid, typically subcooled a few degrees below its condensing temperature to maximize efficiency.
Stages 3 and 4: Handled Indoors
After leaving the condensing unit, liquid refrigerant passes through an expansion device (a metering valve or capillary tube) that drops its pressure and temperature sharply. It then enters the indoor evaporator coil, absorbs heat from the room or refrigerated space, and evaporates back into vapor—completing the cycle and returning to the condensing unit.
Key Components Inside a Condensing Unit
A condensing unit is more than just a metal box. Each component inside plays a specific, measurable role in the system's performance.
Compressor
The compressor is the heart of the condensing unit and the most energy-intensive part. It pressurizes refrigerant vapor and drives it through the system. Three compressor types are commonly found in condensing units:
- Scroll compressors – the industry standard for residential and light commercial systems. They are quieter, more efficient, and more reliable than older designs. Most residential units produced after 2000 use scroll compressors.
- Reciprocating (piston) compressors – found in older systems and some commercial refrigeration units. They are durable but noisier and less efficient at part-load conditions.
- Rotary compressors – compact and common in small window-type or portable units, but rarely seen in large split systems.
Variable-speed (inverter-driven) compressors, increasingly standard in high-efficiency models, modulate their speed to match the actual cooling load rather than cycling on and off at full capacity. This alone can reduce energy consumption by 20–40% compared to single-speed compressors.
Condenser Coil
The condenser coil is typically made of copper tubing threaded through aluminum fins. This fin-and-tube design maximizes surface area for heat transfer. The coil is usually arranged in an A-frame or V-shape configuration around the perimeter of the unit to allow large airflow volumes. In larger commercial condensing units, microchannel coils are increasingly used—these use flat aluminum tubes with multiple small channels, reducing refrigerant charge requirements by up to 30% and improving heat transfer efficiency.
Condenser Fan and Motor
One or more propeller-type fans draw or force air across the condenser coil. In most residential condensing units, the fan sits on top of the cabinet and pulls air upward through the coil (draw-through configuration). Commercial units may use blow-through configurations or multiple fans. Fan motor efficiency matters: ECM (electronically commutated motor) fans use 50–70% less energy than standard PSC (permanent split capacitor) motors and are now standard in higher-SEER units.
Refrigerant Lines and Service Valves
Two refrigerant lines connect the condensing unit to the indoor air handler: the suction line (larger, insulated, carries low-pressure vapor back to the compressor) and the liquid line (smaller, carries high-pressure liquid to the expansion device). Service valves allow technicians to isolate the unit for maintenance or refrigerant charging without recovering the entire system charge.
Electrical Components
Inside the condensing unit's electrical compartment, you'll typically find a contactor (relay that switches power to the compressor and fan), a capacitor (stores and releases electrical charge to start and run motors), a control board (in modern units), and safety switches including a high-pressure cutout and low-pressure cutout. Capacitor failure is one of the most common condensing unit service calls, particularly in hot climates.
Types of Condensing Units
Condensing units are not one-size-fits-all. They are categorized by application, refrigerant type, configuration, and heat rejection method.
| Type | Heat Rejection Method | Typical Application | Capacity Range |
|---|---|---|---|
| Air-Cooled | Ambient air via fans | Residential AC, light commercial | 1.5 – 60+ tons |
| Water-Cooled | Cooling tower or water loop | Large commercial, industrial | 20 – 2,000+ tons |
| Evaporative-Cooled | Water evaporation + air | Hot, dry climates | 5 – 100+ tons |
| Refrigeration (Low-Temp) | Air-cooled, outdoor or indoor | Walk-in freezers, cold storage | 0.5 – 25 tons |
| Remote Condensing | Air-cooled, roof-mounted | Supermarkets, retail refrigeration | 5 – 150 tons |
Air-Cooled Condensing Units
This is by far the most common type. Air-cooled condensing units use outdoor air to absorb and carry away heat. They require no water supply, no cooling tower, and relatively simple installation. Their main drawback is performance degradation in high ambient temperatures: when outdoor air exceeds 95°F (35°C), the condensing temperature rises, the pressure differential across the compressor increases, and both efficiency and capacity drop. This is why proper outdoor unit placement and airflow clearance matter so much.
Water-Cooled Condensing Units
Water-cooled systems use water—typically from a cooling tower or a ground loop—as the heat rejection medium. Because water has much higher thermal capacity than air, water-cooled condensers can operate at lower condensing temperatures even in extreme weather. A water-cooled condensing unit operating at 85°F (29°C) entering water temperature will be significantly more efficient than an air-cooled unit rejecting heat to 100°F outdoor air. These systems are more complex and expensive to install and maintain, making them better suited to large commercial and industrial applications.
Refrigeration Condensing Units
These are purpose-built for commercial refrigeration rather than air conditioning. They operate at much lower suction temperatures—medium-temperature units for walk-in coolers typically maintain suction at around 20°F to 30°F (-7°C to -1°C), while low-temperature units for freezer applications operate at suction temperatures as low as -25°F to -10°F (-32°C to -23°C). Refrigeration condensing units may use R-404A, R-448A, R-449A, or CO₂ as the refrigerant, depending on the application and local environmental regulations.
Condensing Unit vs. Air Conditioner: Understanding the Difference
These terms are often confused. A condensing unit is a specific sub-assembly—the outdoor section that contains the compressor, condenser coil, and fan. An air conditioner refers to the complete system, including both the outdoor condensing unit and the indoor air handler (which contains the evaporator coil and blower).
When an HVAC contractor says they are replacing your "condenser," they mean the outdoor unit only. When they replace the entire system, they are replacing both the condensing unit and the air handler. This distinction matters for cost estimation: replacing only the condensing unit is significantly cheaper than a full system replacement, but mixing an old indoor unit with a new outdoor unit can create compatibility problems, reduced efficiency, and voided warranties—especially if the refrigerant type differs between old and new equipment.
Similarly, a heat pump contains a condensing unit that can reverse its operation. In cooling mode it functions exactly like a standard condensing unit; in heating mode it reverses refrigerant flow so the outdoor coil becomes the evaporator (absorbing heat from outdoor air) and the indoor coil becomes the condenser (releasing heat indoors).
How to Size a Condensing Unit Correctly
Sizing errors are among the most common mistakes in HVAC and refrigeration installations. Both oversizing and undersizing create problems.
Why Oversizing Is a Problem
An oversized condensing unit reaches the thermostat setpoint too quickly, causing short-cycling—frequent on-off cycles that prevent proper dehumidification, increase compressor wear, and reduce overall efficiency. In humid climates, an oversized air conditioner can cool a room while leaving it feeling clammy because the evaporator coil never runs long enough to condense significant moisture. Oversized units also cost more upfront and consume more energy per hour of operation.
Why Undersizing Is Equally Problematic
An undersized condensing unit runs continuously without reaching the setpoint during peak conditions. This causes excessive energy consumption, shortened equipment life from continuous full-load operation, and occupant discomfort during the hottest days of the year.
The Right Approach: Manual J Load Calculation
The industry standard for residential sizing is the ACCA Manual J load calculation, which accounts for:
- Local design temperatures (outdoor summer high and winter low)
- Building orientation and window-to-wall ratio
- Insulation levels in walls, roof, and floor assemblies
- Internal heat gains from occupants, lighting, and appliances
- Infiltration and ventilation loads
- Duct system losses (if applicable)
The common rule of thumb—1 ton of cooling per 400–600 square feet—is a rough starting point at best. A properly insulated modern home in a mild climate may need only 1 ton per 800 square feet, while a poorly insulated older building with large south-facing windows in Phoenix, Arizona, might require 1 ton per 300 square feet or less.
For commercial refrigeration, sizing is based on the box heat load calculation: thermal transmission through walls, floor, and ceiling; product load (the heat stored in warm product being cooled); infiltration load from door openings; internal equipment loads; and pulldown time requirements.
Efficiency Ratings: What SEER, EER, and COP Mean for Condensing Units
Efficiency ratings for condensing units are standardized metrics that let you compare equipment and estimate operating costs.
SEER2 (Seasonal Energy Efficiency Ratio)
SEER2 replaced the older SEER standard in the United States starting January 2023. It measures cooling output (in BTU) divided by electrical energy input (in watt-hours) over a typical cooling season, using updated test conditions that better reflect real-world duct static pressures. Federal minimum efficiency standards as of 2023 are 14.3 SEER2 for most of the U.S. and 13.4 SEER2 for northern states. High-efficiency residential condensing units reach 20–26 SEER2. Each additional SEER2 point reduces cooling energy consumption by roughly 7%.
EER (Energy Efficiency Ratio)
EER measures efficiency at a single operating point—typically 95°F outdoor temperature, 80°F/67°F dry/wet bulb indoor temperature—rather than across a season. It is more useful for comparing units that will operate primarily in hot conditions, such as commercial units in desert climates. A unit with a high SEER but low EER may not perform well during peak summer demand.
COP (Coefficient of Performance)
COP is a dimensionless ratio used in refrigeration and heat pump ratings. A condensing unit with a COP of 3.0 delivers 3 units of heat transfer for every 1 unit of electrical energy consumed. For commercial refrigeration condensing units, COP is often given at a specific suction temperature and ambient temperature, so always compare units at the same operating conditions.
Refrigerants Used in Modern Condensing Units
The type of refrigerant a condensing unit uses affects its efficiency, environmental impact, and long-term serviceability. The refrigerant landscape has shifted significantly over the past two decades.
- R-22 (HCFC-22) – Phased out of new equipment production in the U.S. since 2010 and banned from manufacture/import since January 2020 under EPA regulations. Many older condensing units still use it, but R-22 is now very expensive ($50–$100 per pound in the U.S.) and increasingly scarce. If your condensing unit uses R-22, replacement is usually more cost-effective than repair.
- R-410A – The dominant residential AC refrigerant since the early 2000s. It is being phased down under the AIM Act due to its high global warming potential (GWP of 2,088). Production caps began in 2025, and R-410A will be increasingly restricted in new equipment.
- R-32 – A lower-GWP alternative (GWP of 675) gaining adoption in residential condensing units, particularly from Asian manufacturers. It is mildly flammable (A2L classification), which requires updated installation and service practices.
- R-454B and R-466A – Emerging replacements for R-410A in new residential condensing unit designs. R-454B has a GWP of 466 and is now being adopted by major U.S. manufacturers for 2025-and-later equipment.
- R-404A, R-448A, R-449A – Used in commercial refrigeration condensing units. R-404A is being phased down due to a very high GWP of 3,922; R-448A and R-449A are lower-GWP drop-in alternatives for new and retrofit applications.
Installation Requirements for Condensing Units
A condensing unit that is correctly sized but poorly installed will not perform to its rated capacity. Several installation factors directly affect performance and longevity.
Airflow Clearance
Condensing units need unobstructed airflow for heat rejection. Most manufacturers require a minimum of 18–24 inches of clearance on the sides and 48–60 inches of unobstructed space above for air discharge. Installing a unit in a recessed alcove, against a wall on multiple sides, or under a deck without adequate clearance creates a recirculation problem—the unit ends up drawing hot exhaust air back in, raising the condensing temperature and degrading performance and efficiency.
Pad and Elevation
Ground-mounted condensing units should sit on a solid, level concrete pad or composite pad at least 2–3 inches above grade to prevent flooding and ensure the unit remains level as soil shifts. A unit that tilts can cause oil migration problems in the compressor, leading to premature failure. In regions with significant snowfall, the pad should be tall enough to keep the unit above typical snow accumulation depths.
Refrigerant Line Set Length and Sizing
The refrigerant lines connecting the condensing unit to the indoor air handler must be sized correctly for the system capacity and line length. Excessive line length increases pressure drop and reduces system efficiency. Most manufacturers publish maximum line length specifications—commonly 50–150 feet equivalent length for residential systems. Beyond these limits, additional refrigerant charge, larger line diameters, or a suction line accumulator may be required. The line set must also be insulated to prevent heat gain in the suction line and condensation dripping in humid climates.
Electrical Supply
Condensing units require a dedicated electrical circuit with a disconnect switch located within sight of the unit. The circuit must be sized for the unit's minimum circuit ampacity (MCA) and protected by a breaker or fuse rated at or below the maximum overcurrent protection (MOCP) listed on the nameplate. Using undersized wiring or an incorrect breaker size is a fire hazard and will void the equipment warranty. Most residential units operating on 240V require circuit conductors sized for 20–50 amps depending on tonnage.
Condensing Unit Maintenance: What Needs to Be Done and How Often
A condensing unit that receives regular maintenance runs more efficiently, lasts longer, and fails less often at inconvenient times. Most residential condensing units have a service life of 15–20 years with proper maintenance; neglected units often fail within 10 years.
Condenser Coil Cleaning
The condenser coil accumulates dirt, cottonwood seeds, grass clippings, and other debris that block airflow and insulate the fins from the air flowing through them. A moderately dirty condenser coil can reduce system efficiency by 10–15% and raise head pressure significantly. Coils should be rinsed with a hose from the inside out at least once per year, or more frequently in dusty environments or areas with cottonwood trees. Chemical coil cleaners should be used carefully—some formulations can damage aluminum fins if not rinsed promptly.
Electrical Component Inspection
Annual inspection of the contactor, capacitor, and wiring connections can catch problems before they cause a system failure. Contactors develop pitted contacts after repeated switching, increasing resistance and generating heat. Capacitors degrade over time, particularly in hot climates; a capacitor rated at 45 microfarads (µF) that measures only 40 µF should be replaced, even if the system appears to be running, because the motor is working harder to compensate.
Refrigerant Charge Verification
Condensing units are factory-charged with the exact amount of refrigerant required for proper operation. Refrigerant does not "wear out" or need periodic recharging—if a system is low on refrigerant, there is a leak that must be found and repaired. Operating a condensing unit with a refrigerant undercharge of just 10% reduces efficiency by approximately 20% and stresses the compressor. Overcharging is equally harmful, raising head pressure and potentially causing liquid slugging that damages the compressor. Refrigerant charge should only be checked and adjusted by an EPA Section 608 certified technician.
Fan Blade and Motor Inspection
Fan blades should be inspected for cracks, chips, or bending that can cause vibration and noise. Motor bearings should be checked for smooth operation—a squealing or grinding fan motor is close to failure. Some older PSC fan motors have oil ports that should be lubricated annually; sealed ECM motors do not require lubrication but should be checked for secure mounting and proper blade pitch.
Seasonal Startup and Shutdown Procedures
Before starting a condensing unit after winter dormancy, allow the crankcase heater (if equipped) to warm the compressor oil for at least 4–8 hours. Cold compressor oil does not flow properly and can cause bearing damage on startup. At the end of the cooling season, remove any debris that has accumulated around the unit, ensure the disconnect is properly secured, and do not cover the unit with an airtight cover—this traps moisture and provides nesting material for rodents. A mesh cover that allows airflow is acceptable if falling debris is a concern.
Common Condensing Unit Problems and Their Causes
Understanding common failure modes helps you diagnose problems quickly and communicate clearly with service technicians.
- Unit not starting: Most often caused by a failed capacitor, a tripped high-pressure switch (due to dirty condenser coil, refrigerant overcharge, or blocked airflow), a failed contactor, or loss of power at the disconnect or breaker.
- System running but not cooling: Possible causes include low refrigerant charge (indicating a leak), dirty condenser coil causing high head pressure, failed reversing valve (in heat pumps), or a faulty metering device restricting refrigerant flow to the evaporator.
- Compressor humming but not starting: Classic sign of a failed start capacitor or a mechanically seized compressor. A technician can use a hard-start kit to boost starting torque, which sometimes rescues a compressor that is struggling but not yet fully failed.
- Icing on the outdoor unit: In cooling mode, ice on the condensing unit coil is unusual and typically indicates very low ambient temperature operation (below 60°F) or a refrigerant system problem. In heat pump heating mode, light frosting is normal and should defrost automatically; heavy ice accumulation that does not clear indicates a defrost control malfunction.
- Excessive noise: Rattling often indicates loose panels or debris inside the unit. Grinding or squealing points to failing fan motor bearings. A banging or clanking sound from the compressor suggests internal mechanical damage and usually requires compressor replacement.
- Short-cycling: The unit turns on and off every few minutes without completing a proper cooling cycle. Causes include oversizing, low refrigerant charge, thermostat problems, or a faulty low-pressure or high-pressure safety switch.
When to Repair vs. Replace a Condensing Unit
This is one of the most practical questions homeowners and facility managers face. Several factors should guide the decision.
The most widely used rule of thumb is the 5,000 rule: multiply the age of the unit (in years) by the repair cost (in dollars). If the result exceeds $5,000, replacement is generally the better investment. A 12-year-old unit needing a $500 capacitor gives a score of 6,000—borderline. A 15-year-old unit needing a $1,200 compressor gives a score of 18,000—replacement is clearly better.
Other factors that push toward replacement rather than repair:
- The unit uses R-22 refrigerant and has a significant refrigerant leak. Recharging with R-22 is extremely expensive and only delays the inevitable.
- The SEER rating is below 10. Modern minimum-efficiency units at 14.3 SEER2 will save 30–40% on cooling costs compared to a 10-SEER unit, making the energy payback on a new unit fairly short even before considering repair costs.
- Multiple components have failed in the same season, or the unit has required service more than once in the past two years.
- The compressor has failed and the unit is out of warranty. Compressor replacement costs typically run $1,200–$2,500 for residential units, which in most cases is not justified on a unit older than 10 years.
Choosing the Right Condensing Unit: Key Selection Criteria
When selecting a new condensing unit—whether for a new installation or a replacement—these are the factors that matter most.
- Correct capacity for the load – always based on a proper load calculation, not a rule of thumb or the size of the previous unit.
- Efficiency rating appropriate for the climate – higher SEER2 units cost more upfront but pay back the difference through lower utility bills. In hot climates with long cooling seasons, a 20 SEER2 unit versus a 16 SEER2 unit can save $150–$300 per year on a typical 3-ton residential system.
- Refrigerant compatibility – ensure the new unit's refrigerant is compatible with or replaces the existing system's refrigerant, or budget for a full system replacement if transitioning between incompatible refrigerants.
- Brand reliability and parts availability – research warranty terms (residential compressor warranties from major brands run 5–10 years; parts warranties 5 years) and confirm local availability of service technicians certified for the brand.
- Sound level – measured in decibels (dB). A quiet condensing unit operates at 55–65 dB; louder units can reach 75 dB or more. This matters for units installed near bedrooms, patios, or property lines with close neighbors.
- Variable-speed capability – if the indoor air handler also supports variable speed, a matched variable-speed condensing unit will deliver better humidity control, quieter operation, and higher efficiency than a single-speed unit.